
To find a slow leak in an inflatable sleeping pad, inflate it fully, close the valve, and inspect the valve and pad surface in small sections. Listen for escaping air, or apply a little soapy water and look for bubbles. Mark the suspected spot, rinse and dry the pad, then repeat the check to confirm the leak before repairing it.
A pad can feel softer by morning without having a puncture. Cooler air can reduce internal pressure, and body weight compresses the pad during sleep. Start leak checks when the pad is at a stable temperature, and compare firmness over a similar time interval. If it continues losing pressure while unused, inspect it systematically.
What to gather before checking
- A clean, dry area with enough room to lay the pad flat.
- Water in a basin or spray bottle, plus a small amount of mild dish soap, if the pad material and care instructions allow wet testing.
- A soft cloth or sponge, a marker that will not damage the fabric, and a towel.
- The pad’s care and repair instructions, especially if it has a special fabric coating, built-in pump, or unusual valve.
Use clean water and only enough soap to make a thin solution. Avoid solvents, harsh cleaners, abrasive brushes, and excessive water. General cleaning advice does not replace the manufacturer’s instructions; follow the pad manual for approved cleaners, drying, and repair methods. If you are outdoors, keep soapy water away from streams, lakes, and other water sources, and follow local rules for wastewater disposal.
Step-by-step leak check
1. Inflate and isolate the pad
Inflate the pad to its normal sleeping firmness, not beyond the level allowed in its manual. Close the valve fully and check that its cap, seal, and surrounding area are clean. For a pad with a built-in pump or multiple valve settings, use the manufacturer’s instructions to ensure the valve is in its closed position. A valve left partly open can mimic a puncture.
2. Check the valve first
Bring your ear close to the valve and listen for a faint hiss. Move your hand nearby to feel for escaping air, but do not press or twist parts in a way that could damage the valve. Apply a small amount of soapy water around the valve opening, seams, and valve-to-pad joint. Growing bubbles point to escaping air. A few bubbles from applying the solution are not proof; wipe them away and watch for new bubbles to form.
If the valve area appears to leak, check that it is closed correctly and free of grit or lint. Do not disassemble the valve unless the manual says it is user-serviceable. If cleaning and reseating it do not stop the leak, contact the manufacturer or use its specified repair process.
3. Inspect the pad surface in sections
Lay the inflated pad flat. Work across one small area at a time, including the top, bottom, sidewalls, seams, and corners. Look for sharp objects, pinholes, scuffs, and separated seams. Run your hand near the surface to feel for airflow; move slowly, since a pinhole may release too little air to detect from a distance.
For a wet check, dab or spray a thin layer of soapy water over one section. Watch closely for a stream of bubbles that grows or repeatedly reforms in one spot. Wipe the section and move on only after checking it. Rotate or flip the pad to inspect the other side and edges. Keep the valve closed while you work.
4. Use a listening check if wet testing is unsuitable
In a quiet room, hold your ear near the inflated pad and scan slowly. You can also press gently on a small area to raise pressure slightly, then listen for a hiss. Avoid hard pressing, kneeling, or folding the pad to force air out; excess pressure can stress seams and obscure the original problem. A quiet listening check may miss a very small leak, so repeat it after letting the pad rest.
5. Mark and confirm the suspected spot
Mark the location beside the leak, not over it, using a marker approved for the pad’s fabric. If bubbles appear along a seam or around the valve, mark the exact area as clearly as possible. Dry the surface, reinflate the pad, and repeat the test at that location. Confirmation helps distinguish a real leak from soap foam, condensation, or a valve that was not fully closed.
If you still cannot find the leak
Give the pad time to lose enough air for the pressure change to become noticeable, then repeat the inspection in a quiet setting. Check seams and valve connections again; small leaks can be intermittent or hard to see. If the pad fits in a clean basin without force, you may submerge one section at a time and watch for bubbles. Do not submerge the whole pad unless its manual permits it. Water can enter valves or damage materials, and a large pad can be difficult to handle without stressing seams.
If no leak appears, compare the pad’s pressure after it has rested at a stable temperature. Temperature changes affect air pressure, so a cooler room or campsite can make a pad feel softer. Also check whether the valve is fully closed and whether any removable cap or seal is seated properly. Persistent pressure loss with no visible source may require manufacturer service or inspection by a repair shop.
Common mistakes to avoid
- Testing only the top: Pinholes can be on the underside, sidewalls, seams, or around the valve.
- Using too much soap: Thick foam can hide small bubbles and leave residue. Use a thin layer, then rinse and dry as directed.
- Calling every bubble a leak: Bubbles created while applying solution may not indicate escaping air. Wipe the area and watch for fresh bubbles.
- Overinflating the pad: Extra pressure can strain seams and may damage the pad. Follow the manual’s inflation guidance.
- Repairing before confirming: A patch placed over the wrong spot wastes repair material and may complicate later service.
- Using an unapproved adhesive or patch: Materials and coatings vary. Check compatibility and repair instructions for your exact pad before applying anything.
Once you locate the leak, follow the pad manufacturer’s repair method and allow any repair product to cure for the stated time before use. A patch or sealant suitable for one fabric or model may not bond correctly to another. For a valve failure, large tear, damaged baffle, or leak along a structural seam, seek the manufacturer’s guidance rather than assuming a surface patch will restore the pad.
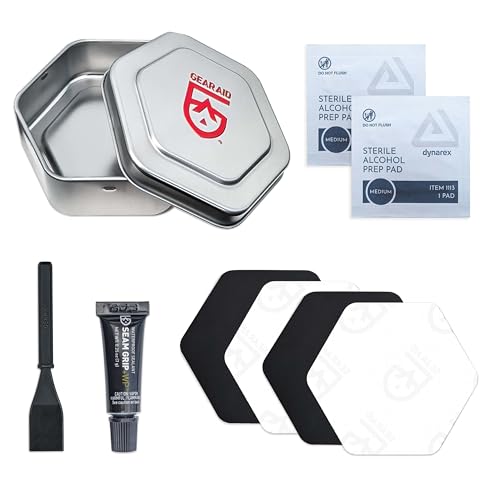
Optional supporting equipment: Sleeping Systems is the site’s related category. For repairs, the sleeping pad guide is not a repair manual; check your pad’s instructions first. One example kit is GEAR AID Seam Grip WP Camp & Trail Repair Kit, supplied with sealant and tape patches. Confirm material and model compatibility before use.
Pros
- Sealant and patches in one kit
- Four 2.5-inch patches included
- Two patch colors
- Listed for several outdoor fabrics
- Reusable metal storage tin
Cons
- Only 0.25 oz of sealant
- Four patches may not cover larger tears
- No cure time listed
Specifications
| Color | Clear |
|---|---|
| Size | Deluxe Kit - 1 Pack |
| Dimensions | 5 x 1.25 x 7 inches |
| Product Group | Outdoors |
| Binding | Misc. |
Verify the current product variation before purchase; specifications may change.
Detailed Review
What stands out in the currently available product data:
- Seal pinholes and seams on tents, tarps, and other listed outdoor fabrics.
- Use four 2.5-inch patches for holes or tears, with two black and two clear.
- Flexible, waterproof sealant is described as abrasion-resistant and made to resist peeling or cracking.
- Works with nylon, polyester, canvas, and ripstop, according to product details.
- Reusable metal tin keeps repair supplies together in a pack or gear bag.
- Compact format suits backpacking, car camping, and extended trips.
Best For / Avoid If
Best for buyers prioritizing
- Sealant and patches in one kit
- Four 2.5-inch patches included
- Two patch colors
Consider another option if
- Only 0.25 oz of sealant
- Four patches may not cover larger tears
- No cure time listed
FAQs
Can I find a sleeping pad leak without water?
Yes. Inflate the pad, close the valve, and listen closely in a quiet place. Scan the surface slowly and feel for airflow near suspected spots. This method may miss a tiny leak, so repeat it or use a small amount of soapy water if the pad manual allows wet testing.
How long should I wait to see whether the pad is leaking?
There is no universal wait time. It depends on leak size, pad construction, temperature, and how firmly the pad is inflated. Compare firmness after a consistent period in a stable-temperature setting. A change in temperature alone can change how firm the pad feels.
Why does my pad get softer overnight if I cannot find a hole?
Cooler nighttime air can lower internal pressure, and body weight compresses the pad while you sleep. A valve that is not fully closed can also allow air to escape. Check the valve and compare pressure at similar temperatures before deciding that the pad has a puncture.
Should I submerge the whole sleeping pad?
Only if the manufacturer permits it and you can do so without forcing or folding the pad. Submerging may let water enter the valve or affect materials, and large pads can be difficult to handle. Testing one section at a time with a thin layer of soapy water is often more manageable.
What if the leak is at the valve or seam?
Check the manual before attempting a repair. Do not disassemble a valve or apply adhesive unless the manufacturer approves that method and material. Valve failures, large tears, and structural seam leaks may need manufacturer service or a repair method specific to the pad.