

Pack wet winter camping gear in separate, leak-resistant containers, keep it away from dry clothing and sleeping gear, and secure it so it cannot shift while you drive. At home, unpack it promptly and dry each item fully before storage. Wet gear packed tightly can spread moisture, collect grit, and develop mildew; freezing temperatures can also make damp equipment stiff or brittle.
Before packing, sort gear into three groups: items that must stay dry, wet items that can be contained, and equipment that needs special handling. Keep dry sleep systems, spare clothes, papers, and electronics protected from wet shells and snow-covered boots. Use a separate bag, tote, or vehicle cargo-area liner for damp equipment. A waterproof bag can help contain moisture, but it does not make wet gear safe to leave sealed for long periods.
Pack wet gear in a controlled order
1. Check the gear before loading
Shake off loose snow and brush away dirt when practical. Remove ice only if it comes away without force; do not bend frozen tent poles or scrape coatings with a sharp tool. Check pockets, tent corners, boot tongues, and bag compartments for snow, water, food scraps, or small items. Emptying these areas now reduces leaks, odors, and forgotten gear later.
Follow each item’s care instructions. Some fabrics, coatings, insulation, and closures can be damaged by heat, aggressive brushing, detergents, or prolonged damp storage. When instructions are unavailable, use gentle handling and avoid assumptions about what a material can tolerate.
2. Keep dry and damp equipment apart
Load dry gear first, in clean, closed containers or the driest part of the vehicle. Put wet gear in a separate, washable tub or a bag designed to contain water. A plastic liner can help protect vehicle upholstery, but check for holes and keep the liner from blocking vehicle controls, visibility, or required access to safety equipment.
Contain boots, gaiters, and wet clothing separately from sleeping bags and insulated layers. Brush off mud before bagging; grit can abrade fabric and transfer to other equipment. If wet items are very muddy, keep them apart until you can clean them according to their care labels.
3. Reduce bulk without forcing gear
Drain loose water and shake out wet fabric, but do not wring, crush, or tightly compress items unless their instructions allow it. In particular, avoid prolonged compression of insulated sleeping bags and pads. Fold or roll tents loosely enough to fit the vehicle. Keep poles and stakes together, protect sharp ends, and do not force cold or frozen components into tight bends.
Do not rely on packing a wet tent into its normal storage sack to keep the rest of your load dry. Place it in a separate container or accessible area. If it is frozen, handle it carefully and let it thaw before cleaning, folding tightly, or inspecting delicate parts.
4. Secure the load and manage meltwater
Position heavy containers low and secure them against sliding. Keep wet items away from seat belts, child safety-seat areas, airbags, windows, and the driver’s line of sight. Never allow loose equipment to obstruct pedals or controls. A sealed container may trap meltwater, so check its closure and place it where a leak will not reach electrical equipment or vehicle materials.
Do not leave wet equipment loose in the passenger area, where it can drip or shift. Do not dry gear on a heater, near an exhaust outlet, or against a hot surface while driving. Vehicle heating and ventilation vary; use them only in ways allowed by the vehicle manual, and never block vents or compromise safe driving.
Choose a container for the trip, not long-term storage
For a short drive, a waterproof roll-top sack can keep damp clothing or small equipment separate from dry gear. It is containment, not a drying method. Follow the container maker’s closure directions and limits; do not assume a bag is safe for submersion or will prevent leaks if damaged or closed incorrectly. Large tubs work well for bulky boots and packs, while a washable liner can protect the cargo area.
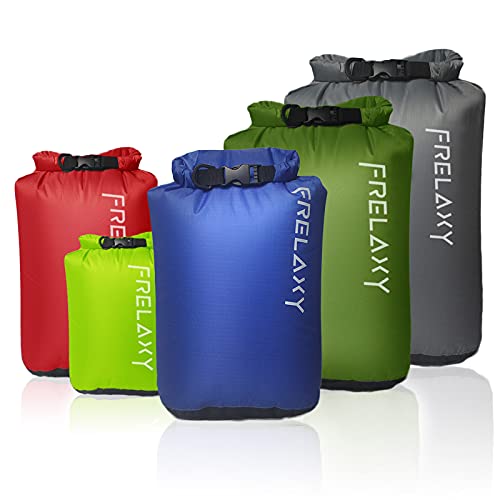
Optional supporting equipment: winter camping gear may include separate sacks for sorting clothing and smaller items. The backpacking and hiking gear category offers context for organizing items on trips. For example, Frelaxy Dry Bag 5 Pack, Ultralight Waterproof Dry is described as a set of five roll-top sacks in 3L, 5L, 10L, 15L, and 20L sizes. Its supplied description says to avoid full submersion. Use any dry bag only as temporary separation; unpack and dry contents at home.
Pros
- Five useful capacities from 3L to 20L
- Lightweight 210T tear-resistant polyester
- Taped seams and roll-top closures
- Color-coded organization
- Rectangular space-efficient bases
Cons
- Not designed for full submersion
- Thin fabric needs careful handling around abrasion
- Five-pack may exceed needs of solo users
Specifications
| Color | 5 Pack - Assorted Colors |
|---|---|
| Size | 3L, 5L, 10L, 15L, 20L |
| Dimensions | 9.4 x 6.3 x 22 inches |
| Weight | 0.6 Pounds |
| Product Group | Sports |
| Binding | Luggage |
Verify the current product variation before purchase; specifications may change.
Detailed Review
What stands out in the currently available product data:
- Five sizes simplify sorting clothing, food, and small camp gear
- Roll-top closures create a secure seal against rain and splashes
- Taped seams help limit water entry during outdoor use
- Ultralight construction adds minimal weight to packs and luggage
- Rectangular bases make packing more space-efficient
- Color-coded bags help identify contents quickly
At home: unpack, inspect, and dry
Unload wet items as soon as practical. Open bags and containers, separate layers, and spread gear out in a dry, ventilated place. Follow manufacturer instructions for washing, drying, and storage. Do not assume a clothes dryer, direct sunlight, radiator, or high heat is suitable. Keep equipment away from flames, hot stoves, and fuel-burning appliances.
Dry tents fully before storing them. Open doors and vents, separate damp fabric from the floor where possible, and check seams, corners, and folds for trapped moisture. Dry sleeping bags and insulated clothing according to their labels; do not store them compressed or damp. Clean boots and other equipment according to their makers’ guidance, then dry them without excessive heat.
Inspect gear for tears, damaged coatings, loose seams, broken poles, or faulty closures. Clean and repair only with methods and materials approved for that item or model. A patch or adhesive that works on one fabric may not bond safely to another. If damage affects a component’s safe use, consult its manufacturer or replace it before the next trip.
Practical checks before departure
- Dry sleep gear and spare clothes separated from wet items.
- Snow, mud, and loose water removed where practical.
- Wet gear placed in a separate container that is intact and properly closed.
- Sharp poles and stakes protected; frozen components handled gently.
- Load secured without blocking driver visibility, controls, seat belts, or safety equipment.
- Plan to unpack and dry gear promptly after arriving home.
Common mistakes and limits
Do not seal wet equipment and forget it in a vehicle or storage space. A waterproof container can hold moisture in as well as keep rain out. Do not mix wet boots with clean sleep gear, force frozen tent fabric into a tight bundle, or use strong heat to speed drying without checking item instructions.
Cold, snow, and road conditions may make loading difficult. Keep yourself and others clear of traffic, avoid overloading the vehicle, and follow vehicle guidance for cargo limits and securement. For fuel, electrical, water, wildlife, or weather concerns at camp, follow equipment manuals and applicable local or official guidance; packing advice cannot replace those requirements. Never operate fuel-burning equipment inside a tent or enclosed shelter.
FAQs
Can I pack a wet tent in its stuff sack for the drive?
Yes, for transport if that is the easiest safe way to carry it, but keep it separate from dry gear and unpack it promptly. A stuff sack may not contain leaks. Use an additional container or liner if needed, and dry the tent fully before long-term storage.
Should I leave a wet sleeping bag compressed until I get home?
Keep compression as brief as practical. Transport it loosely in a separate bag or container if space allows, then unpack and dry it according to its care instructions. Do not store it compressed while damp.
Can I dry camping gear in the car on the drive?
Do not drape gear over controls, seat belts, windows, or vents, or place it near hot surfaces. Keep the load secured and follow the vehicle manual. Dry gear at home in a suitable ventilated area, following each item’s instructions.
What if my gear is frozen solid?
Shake off loose snow and handle frozen fabric and components gently. Avoid forcing folds, poles, zippers, or buckles. Let items thaw in a controlled place before cleaning or tightly packing them, then inspect them for damage and dry them fully.